BLIKVM-CM4 version guide
Geerling: Engineering Test video
BliKVM v1 is a production-ready, plug and play KVM-over-IP device that offers professional users a convenient solution for remote server or workstation management. It is based on Linux and fully open source. With BliKVM, you can easily power on/off, restart your computer, configure UEFI/BIOS settings, and perform OS reinstallation using an emulated Mass Storage Device. BliKVM simulates a keyboard, mouse, and monitor, all accessible through a web browser, ensuring a seamless user experience. Its hardware-level access guarantees independence from specific remote ports, protocols, or services, making it a highly flexible and reliable remote management solution for professionals!
Features
- Video capture (HDMI, support 1080P@60Hz input)
- Keyboard forwarding
- Mouse forwarding
- Mass Storage Drive
- ATX Control the server power using ATX functions
- Fullscreen mode
- Access via Web UI
- Support multi language switching
- Serial console port
- OLED display
- Real Time Clock (RTC)
- FAN
Installation requirements
If you have an assembly kit, you will need the following things
- Raspberry CM4 with 1Gb RAM or more.
- USB-C to USB-A cable.
- HDMI cable.
- Straight Ethernet cable (for the ATX board connection).
- Power supply unit (5.1V 3A USB-C, recommended by the Raspberry Pi).
Power supply
You must use a USB-C to USB-A cable. Using a USB-C to USB-C cable will not work. This is an incompatibility in the hardware design and will be fixed in a later version.
Basic setup
1. The SD card preloaded with the factory default image does not require burning. If you need to reflash the system or for DIY purposes, you can followFlash the memory card or eMMC
2. If you have a non-plug version, refer to the video and instructions below for device installation:
- Use the provided screwdriver to open the metal casing and remove the PCB motherboard.
- Install the CM4 onto the PCB motherboard, ensuring that the two rows of card slots are aligned. Apply the thermal conductive silicone pad onto the CM4 main chip to facilitate heat dissipation using the metal casing. The fan is not connected by default as the metal casing provides sufficient heat dissipation. Depending on your CM4 version, selectively install the Wi-Fi antenna.
- Reassemble the PCB motherboard and the metal casing to complete the installation.
- Please note that translations might vary depending on context and specific terminology used in technical instructions.
Video Guide: Metal case step by step
Ortimo: BLIKVM with Raspberry PI CM4 16GB EMMC setup
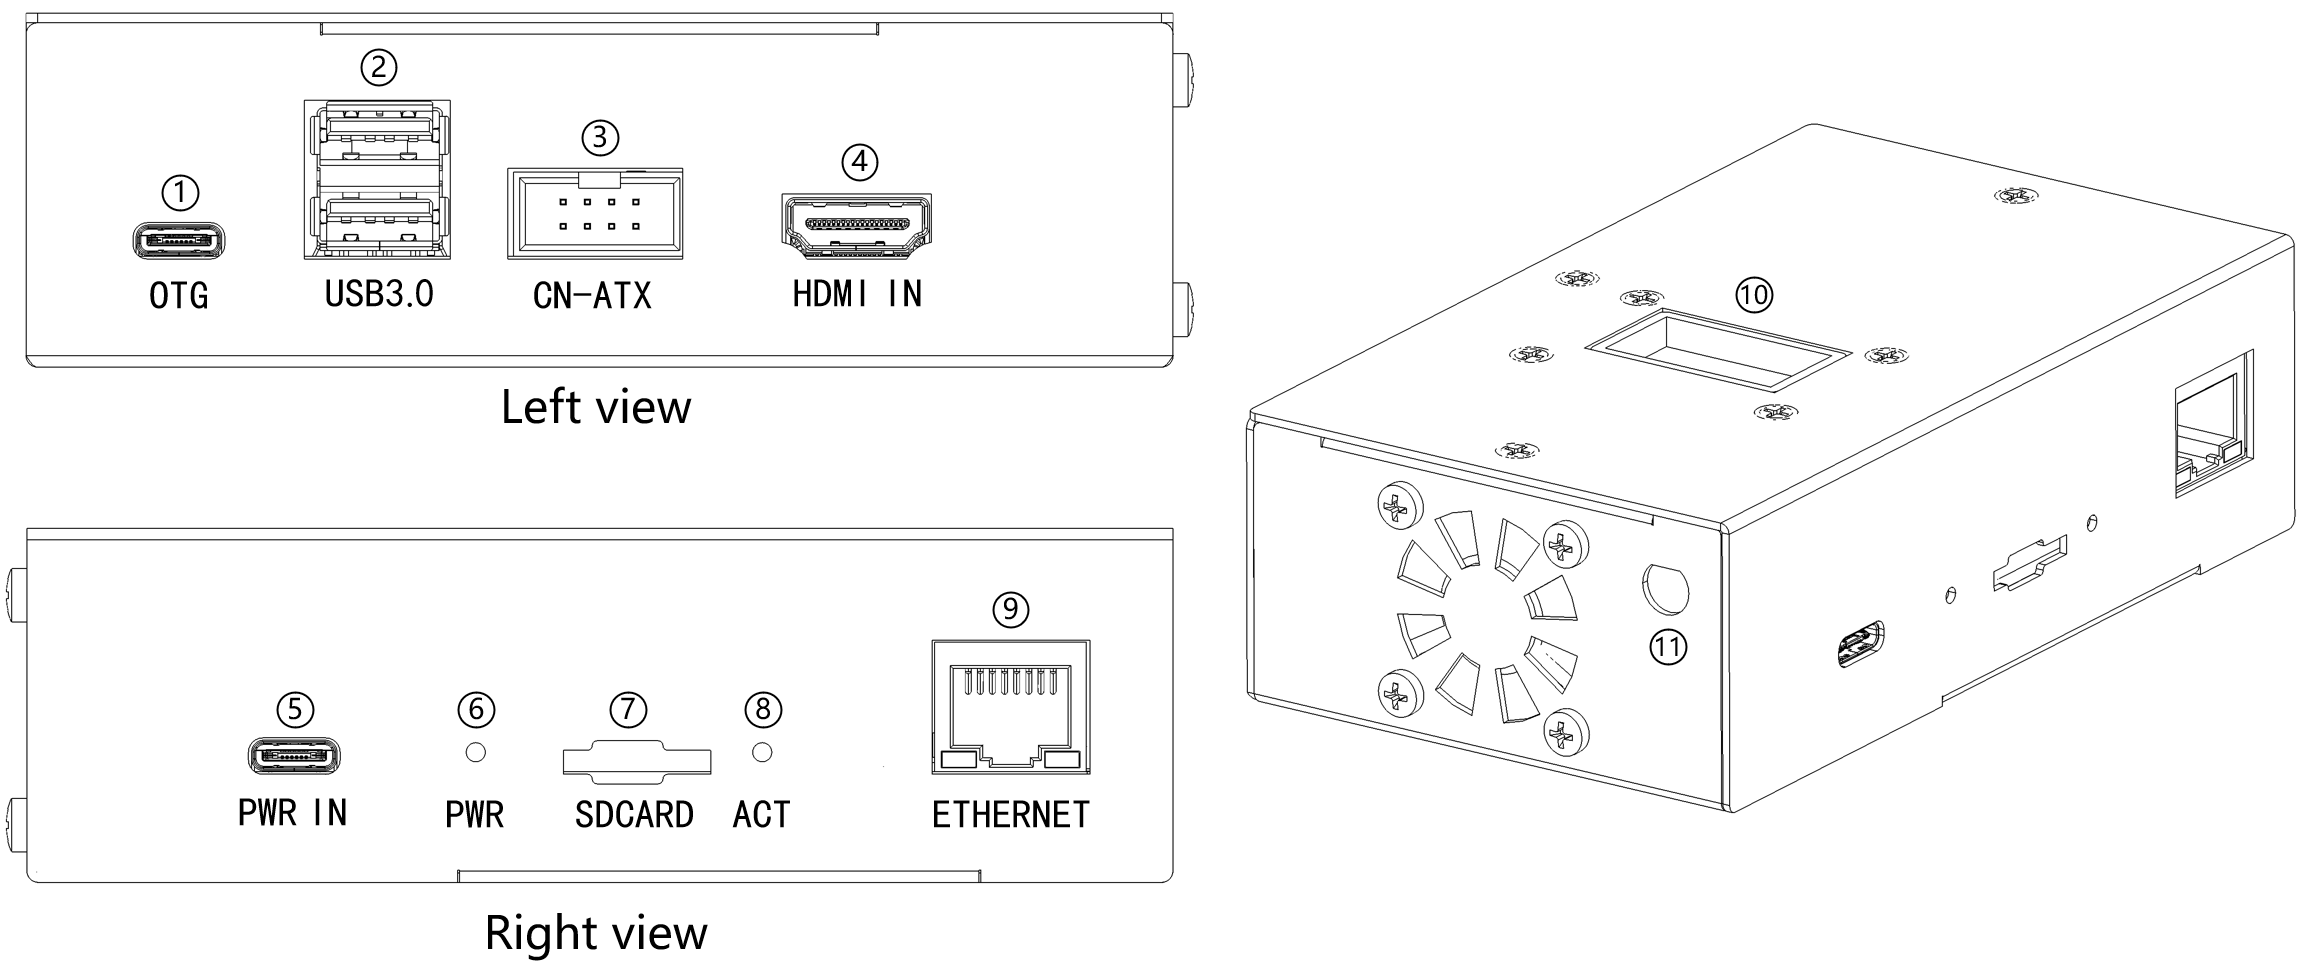
3. Connect BLIKVM to the computer according to the diagram below:
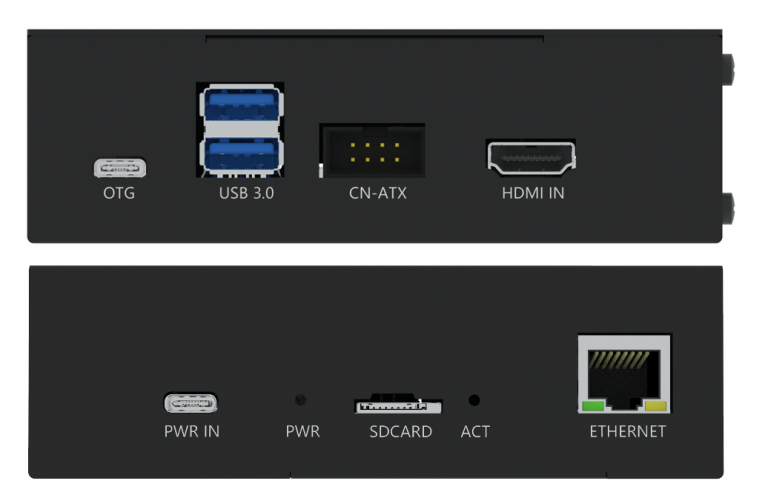
- HDMI IN and otg port must be connected to the computer. ATX too, but it’s optional, read below. There should be no USB hub between BLIKVM and the computer, as some UEFI/BIOS cannot detect them at the boot stage. BLIKVM supports 1080p60Hz or lower about HDMI source.
- Connect Ethernet to the network and PWR IN to the BLIKVM power supply.
4. ATX connection
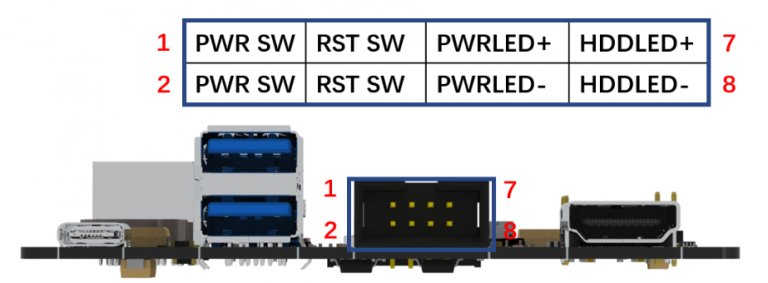
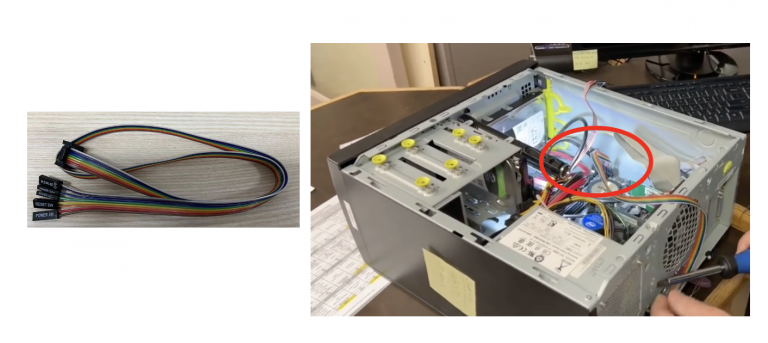
To manage the power of your computer, you will connect CN-ATX port to the computer.The user can use the ATX cable provided with the product to connect the product and the motherboard ATX switch of the controlled computer. The length of the ATX cable is 60CM, you can also use the double female Dupont cables.
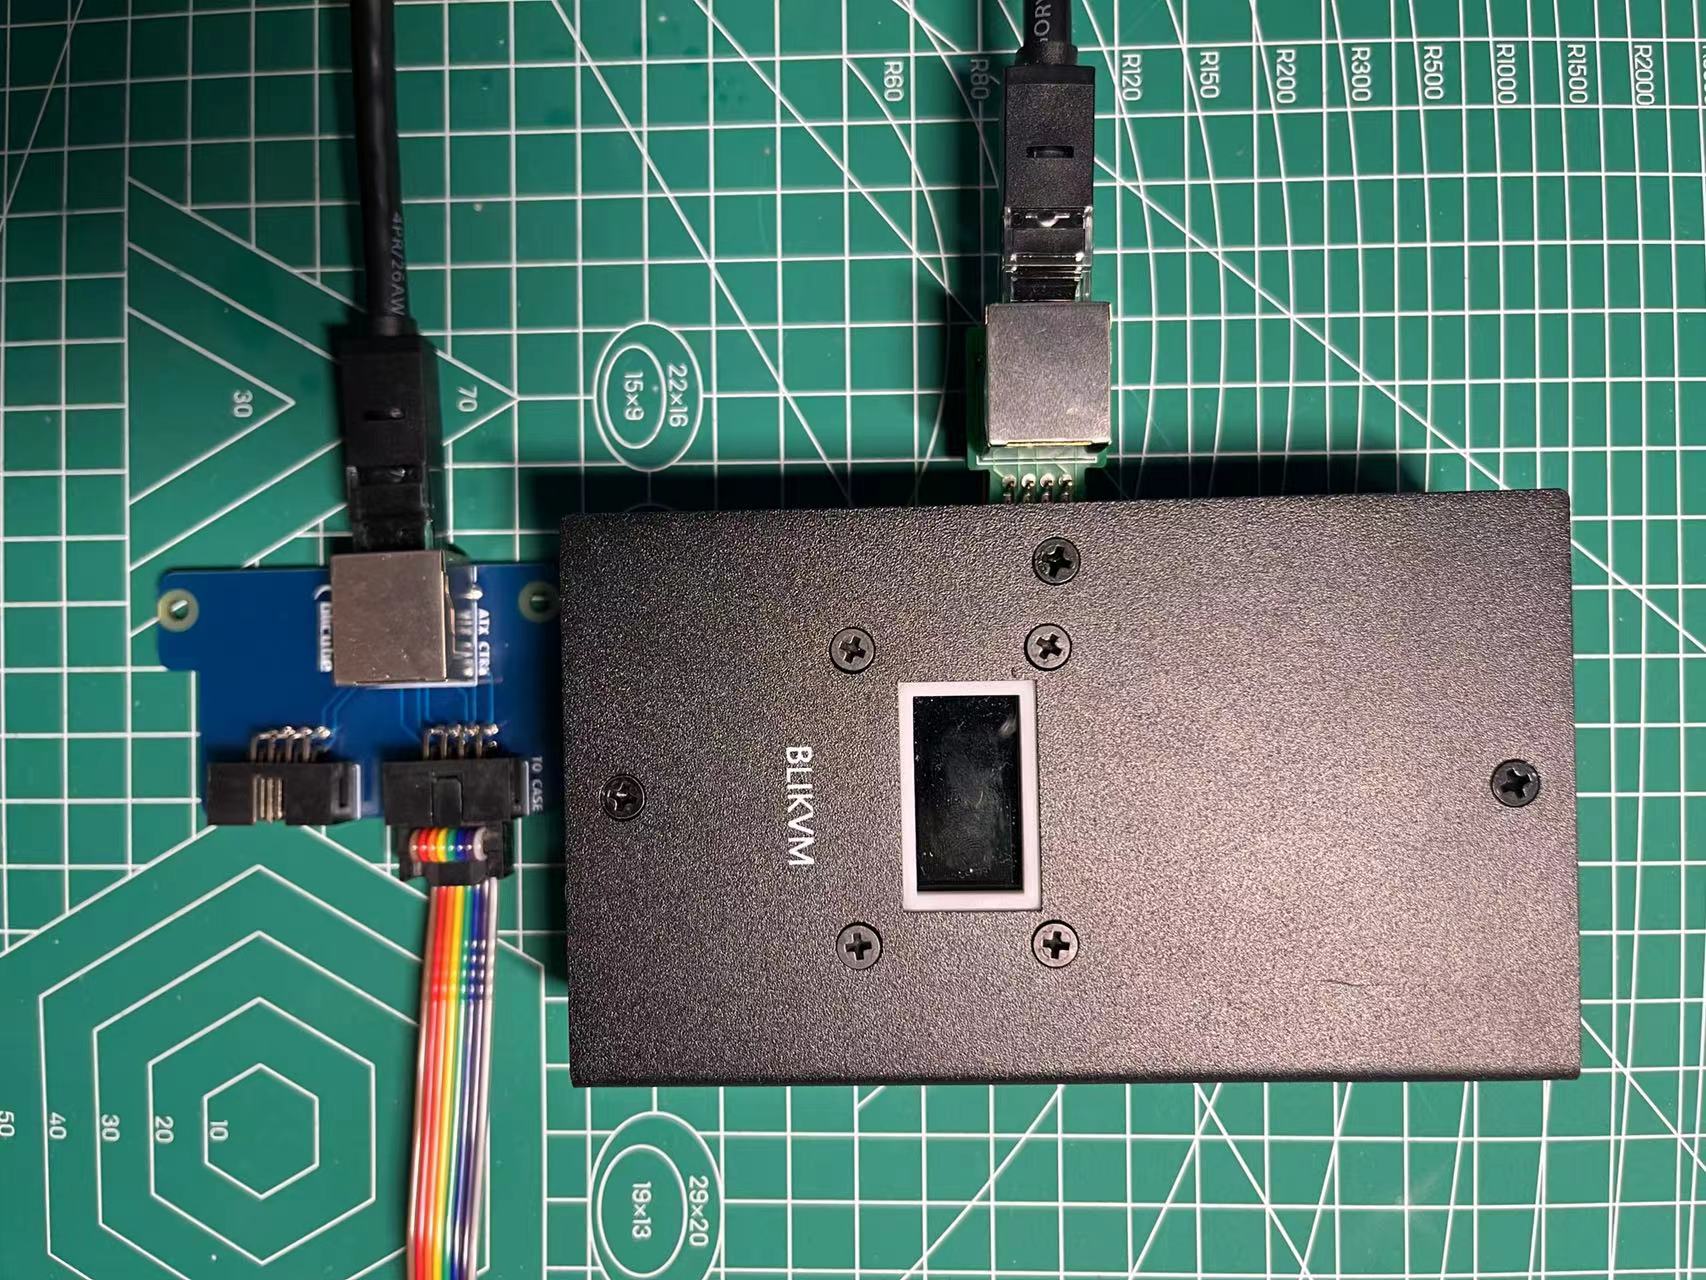
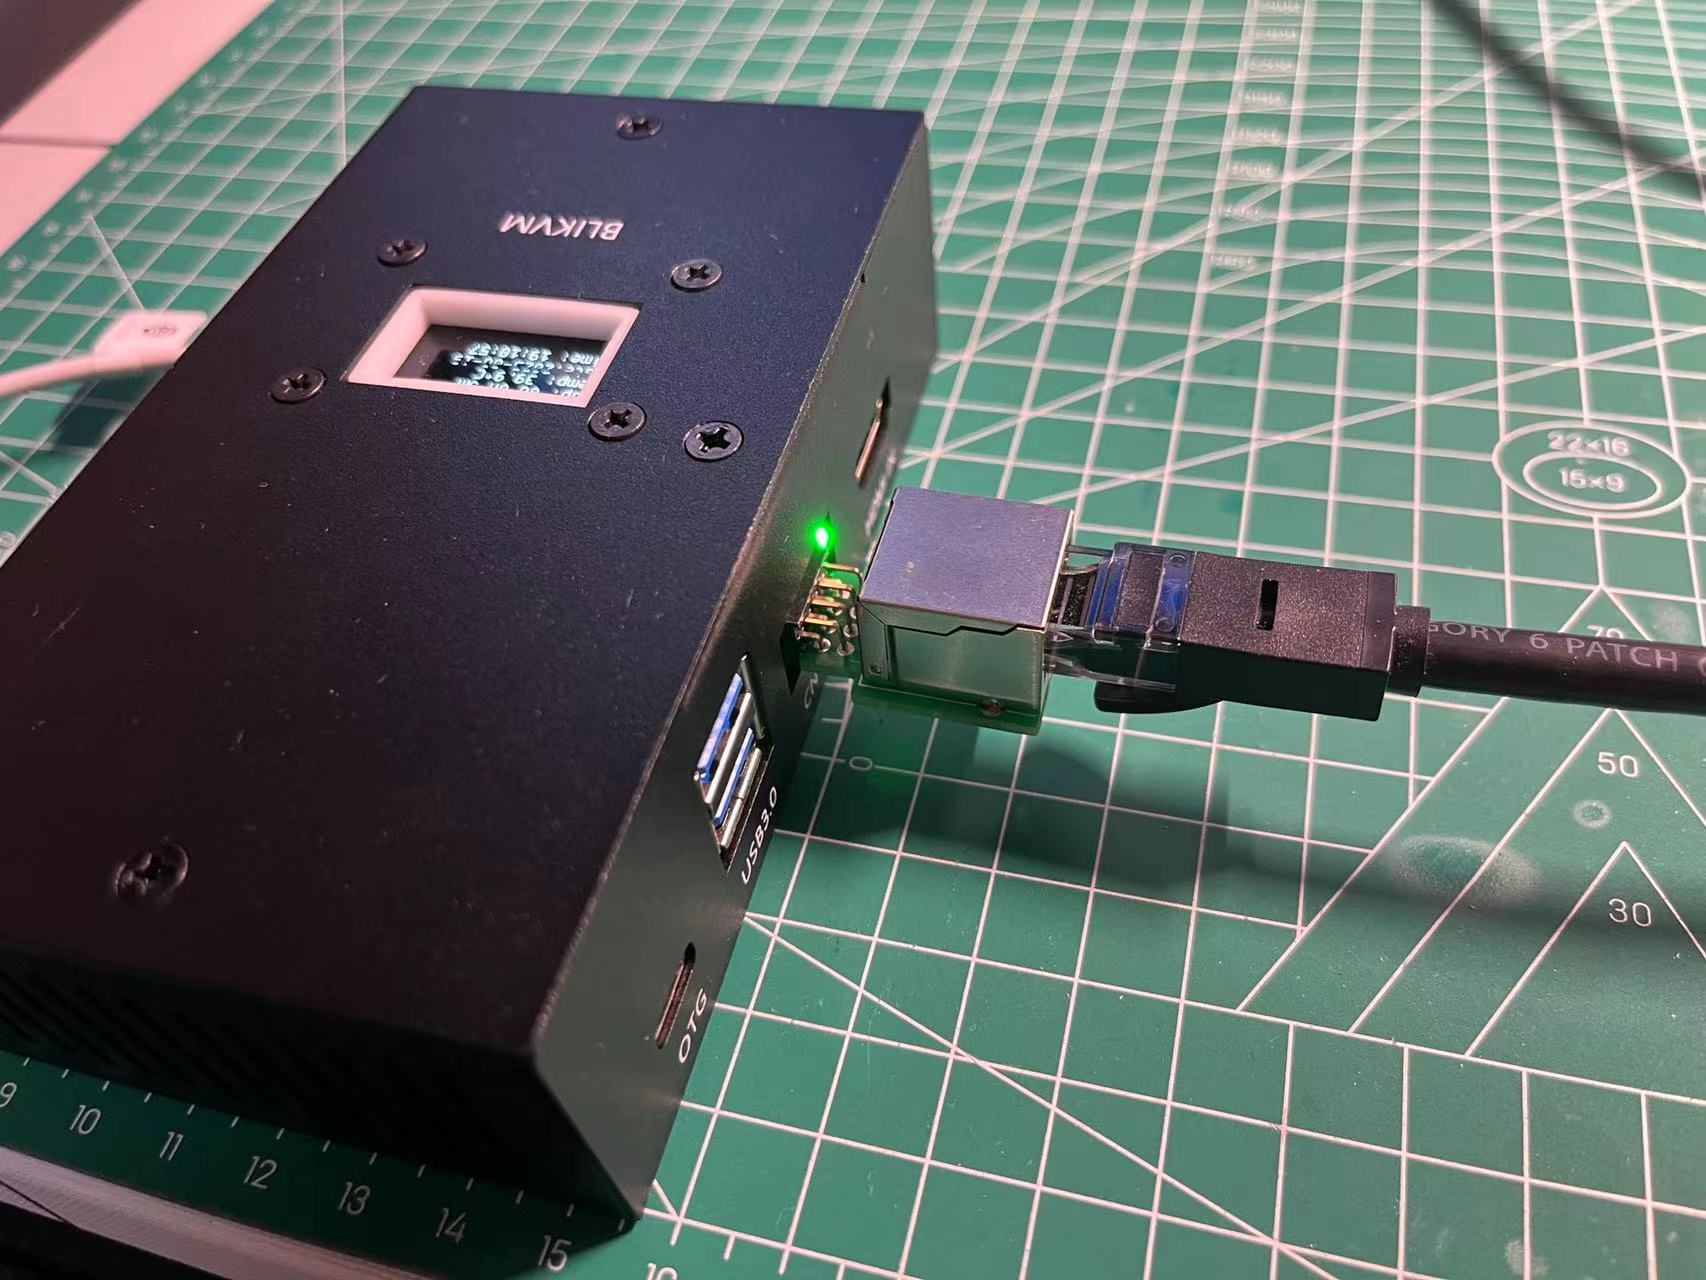
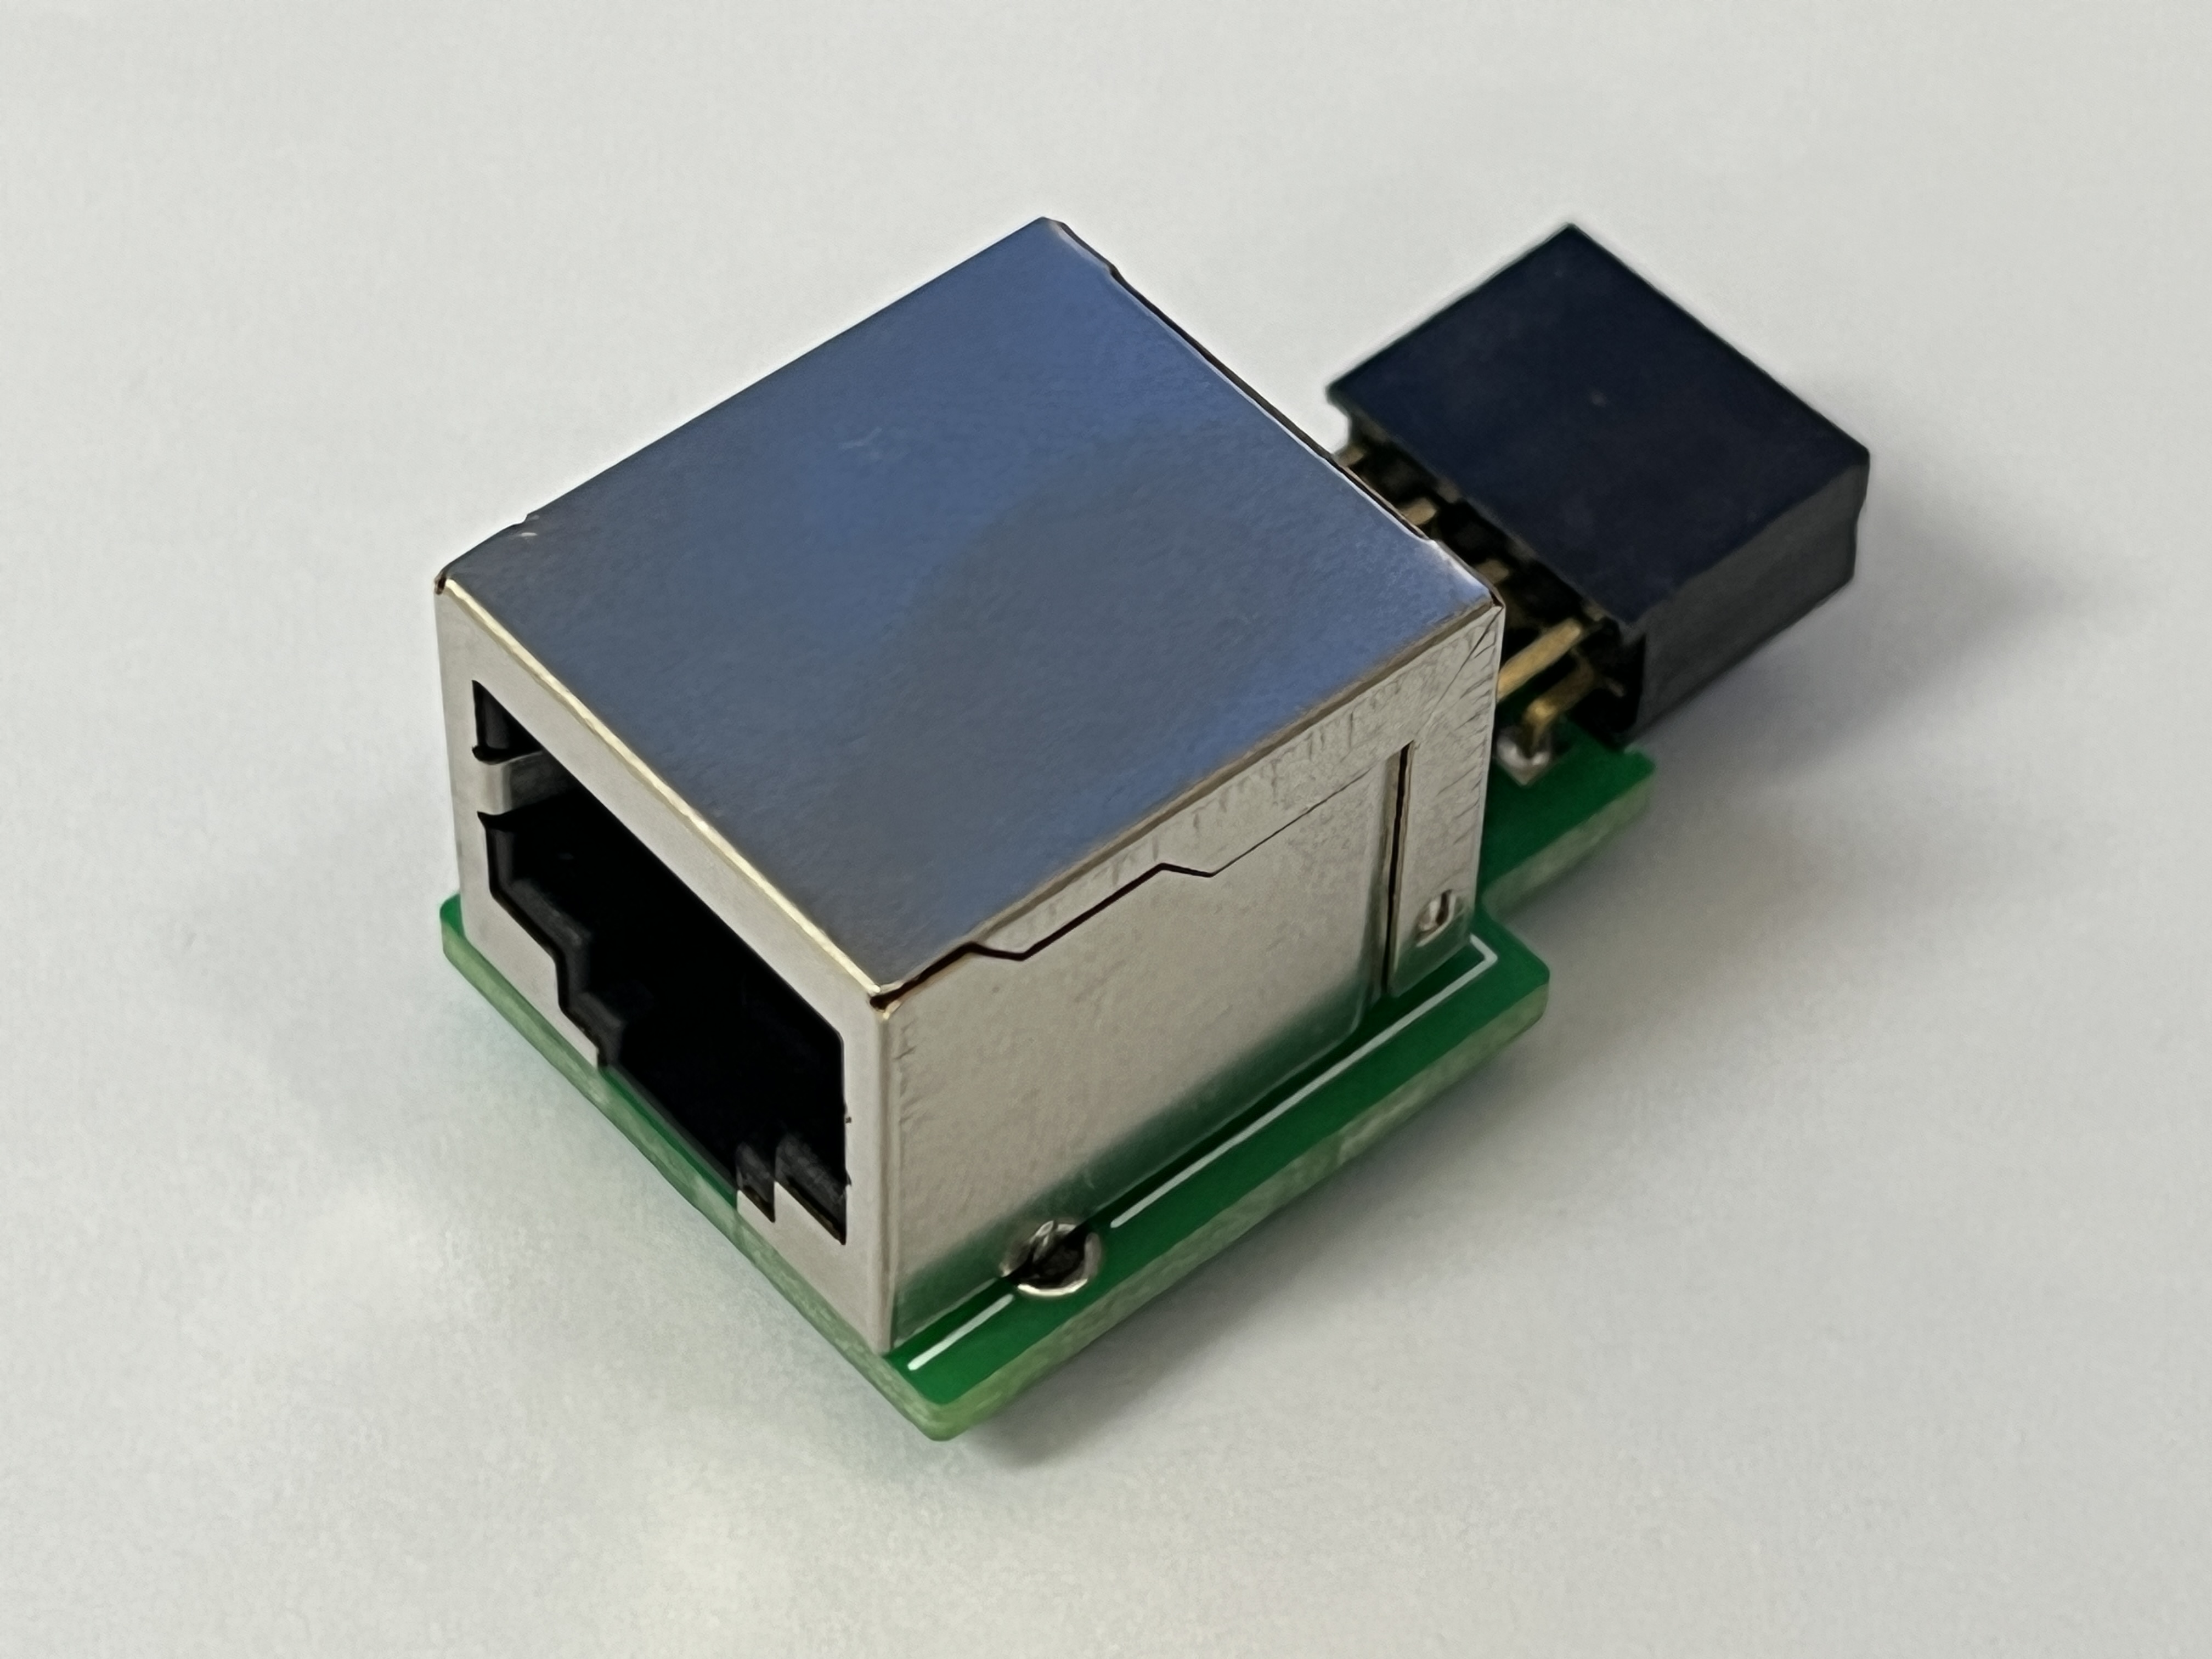
To accommodate ATX control boards with Ethernet ports, v1 has a dedicated ATX expansion kit available. This kit enables customers to connect the ATX board installed on the chassis panel directly using an Ethernet cable.
5. After all the connecting cables are properly set up, power on the BliKVM until the display screen shows an image, indicating that the device has successfully started.
6. Read the "First Steps" guide carefully. It provides instructions on how to find the device on the network, how to log in, change passwords, and more. Follow the steps described there and then return to this page.
As BliKVM v1 also supports PiKVM OS, if your v1 comes with PiKVM as the factory OS, please refer to the documentation for web usage instructions.
7. Try managing your computer using the BliKVM web interface. Make sure you can see the image and that the keyboard and mouse are working properly. If you encounter any issues, check out our FAQ (it's very helpful). If you find no solution there, seek support in our Discord chat room.
8. You can explore other pages in the wiki to discover more features of BliKVM. Enjoy your experience!
Wi-Fi Antenna Connection
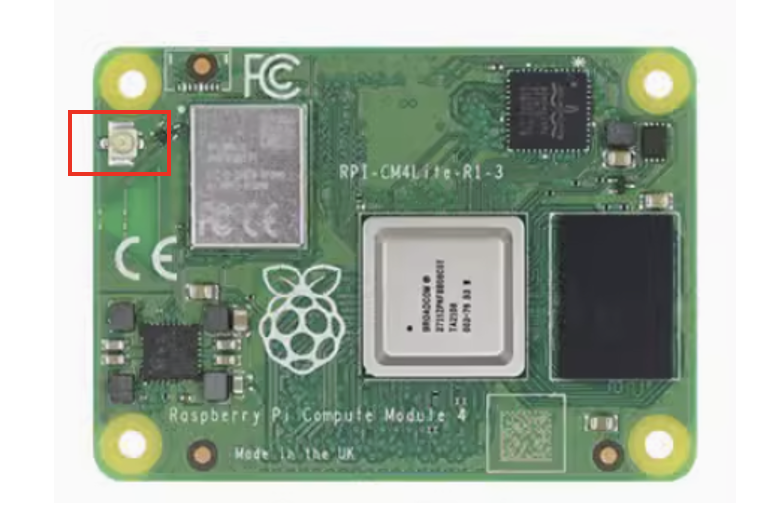
If your CM4 has Wi-Fi functionality, open the metal casing of v1 and attach the Wi-Fi antenna from the package to the IPX interface on the CM4, as shown by the red box in the diagram below; the installation location on the casing for the antenna is defined as position 11 in the interface layout diagram.
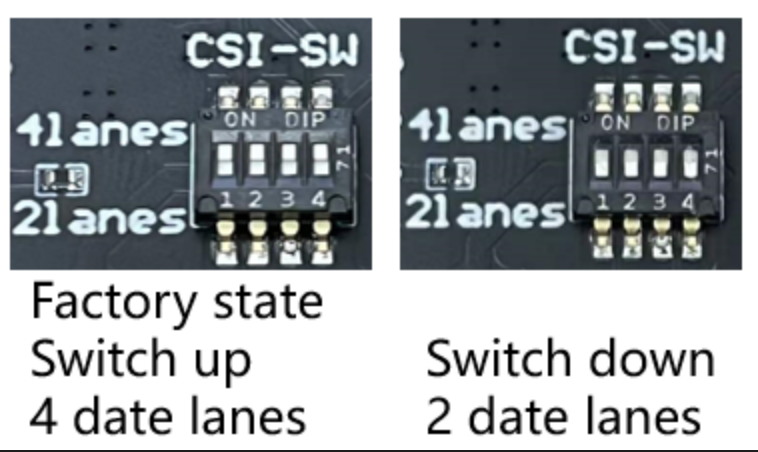
Support 1080p60hz HDMI input
First in V2.2 version, there is CSI channel switch. This switch is switch 2 csi channels or 4 csi channels.
In other versions, the switch is obsolete. Newer keeps the factory state, ignore this switch. Only flip the switch when the device is powered off, otherwise it may cause permanent damage! The four small switches should be up or down at the same time.
Product List
| BLIKVM v1 excluding CM4 | |
|---|---|
| Case | 1 |
| PCB | 1 |
| Fan | 1 |
| SD card 32G | 1 |
| ATX Dupont Cables | 1 |
| OLED | 1 |
| BLIKVM v1 including CM4102000 | |
|---|---|
| Case | 1 |
| PCB | 1 |
| CM4102000 | 1 |
| Fan | 1 |
| SD card 32G | 1 |
| ATX Dupont Cables | 1 |
| OLED | 1 |
| WiFi antenna | 1 |
| BLIKVM v1 including CM4002000 | |
|---|---|
| Case | 1 |
| PCB | 1 |
| CM4002000 | 1 |
| Fan | 1 |
| SD card 32G | 1 |
| ATX Dupont Cables | 1 |
| WiFi antenna | 1 |
Buy link
Created: June 4, 2022